1탄에서 기본적인 Swagger 세팅은 마쳤다.
이번엔 좀 더 심화 과정을 진행해보려 한다.

1. chatGPT한테 ' 아까 세팅한 api server와 swagger에 CRUD를 추가해 줄 수 있어?'라고 질문했더니 아래와 같은 내용을 답변해 줬다.
index.js 파일을 아래 내용으로 변경한다.
const express = require('express');
const swaggerUi = require('swagger-ui-express');
const swaggerJsdoc = require('swagger-jsdoc');

const app = express();
const port = 3000;

// Swagger 설정
const swaggerOptions = {
  definition: {
    openapi: '3.0.0',
    info: {
      title: 'CRUD API',
      version: '1.0.0',
      description: 'A simple CRUD API with Swagger',
    },
    servers: [
      {
        url: 'http://localhost:3000',
      },
    ],
  },
  apis: ['./routes/*.js'], // Swagger 문서화 대상 경로
};

const swaggerSpec = swaggerJsdoc(swaggerOptions);

// Swagger UI 엔드포인트
app.use('/api-docs', swaggerUi.serve, swaggerUi.setup(swaggerSpec));

// JSON 데이터 처리
app.use(express.json());

// API 라우트
const apiRoutes = require('./routes/crud');
app.use('/api', apiRoutes);

// 서버 실행
app.listen(port, () => {
  console.log(`Server running at http://localhost:${port}`);
  console.log(`Swagger docs available at http://localhost:${port}/api-docs`);
});
2. routes폴더에 crud.js라는 파일을 생성한 다음, 아래 내용을 붙여 넣기 한다.
cd routes
echo. > crud.js
const express = require('express');
const router = express.Router();
// 메모리 데이터베이스
let items = [];
let idCounter = 1;
/**
* @swagger
* tags:
* name: Items
* description: API to manage items.
*/
/**
* @swagger
* /api/items:
* post:
* summary: Create a new item
* tags: [Items]
* requestBody:
* required: true
* content:
* application/json:
* schema:
* type: object
* required:
* - name
* properties:
* name:
* type: string
* responses:
* 201:
* description: Item created successfully
*/
router.post('/items', (req, res) => {
const { name } = req.body;
const newItem = { id: idCounter++, name };
items.push(newItem);
res.status(201).json(newItem);
});
/**
* @swagger
* /api/items:
* get:
* summary: Get all items
* tags: [Items]
* responses:
* 200:
* description: List of items
* content:
* application/json:
* schema:
* type: array
* items:
* type: object
* properties:
* id:
* type: integer
* name:
* type: string
*/
router.get('/items', (req, res) => {
res.json(items);
});
/**
* @swagger
* /api/items/{id}:
* get:
* summary: Get an item by ID
* tags: [Items]
* parameters:
* - in: path
* name: id
* required: true
* schema:
* type: integer
* responses:
* 200:
* description: The requested item
* content:
* application/json:
* schema:
* type: object
* properties:
* id:
* type: integer
* name:
* type: string
* 404:
* description: Item not found
*/
router.get('/items/:id', (req, res) => {
const id = parseInt(req.params.id, 10);
const item = items.find((i) => i.id === id);
if (!item) {
return res.status(404).json({ error: 'Item not found' });
}
res.json(item);
});
/**
* @swagger
* /api/items/{id}:
* put:
* summary: Update an item by ID
* tags: [Items]
* parameters:
* - in: path
* name: id
* required: true
* schema:
* type: integer
* requestBody:
* required: true
* content:
* application/json:
* schema:
* type: object
* properties:
* name:
* type: string
* responses:
* 200:
* description: Item updated successfully
* 404:
* description: Item not found
*/
router.put('/items/:id', (req, res) => {
const id = parseInt(req.params.id, 10);
const { name } = req.body;
const item = items.find((i) => i.id === id);
if (!item) {
return res.status(404).json({ error: 'Item not found' });
}
item.name = name;
res.json(item);
});
/**
* @swagger
* /api/items/{id}:
* delete:
* summary: Delete an item by ID
* tags: [Items]
* parameters:
* - in: path
* name: id
* required: true
* schema:
* type: integer
* responses:
* 204:
* description: Item deleted successfully
* 404:
* description: Item not found
*/
router.delete('/items/:id', (req, res) => {
const id = parseInt(req.params.id, 10);
const itemIndex = items.findIndex((i) => i.id === id);
if (itemIndex === -1) {
return res.status(404).json({ error: 'Item not found' });
}
items.splice(itemIndex, 1);
res.status(204).send();
});
module.exports = router;
3. 그리고 다시 api_server 경로에서 node index.js를 실행한다.
cd api_server
node index.js
(port가 이미 사용 중이라는 에러가 뜨는 경우 참조)
https://ashley-choi.tistory.com/58
이미 사용 중인 포트 / address already in use :::3000 해결법
3000번 포트를 실행하려는데 이미 사용 중인 포트라면서 실행이 안될 때,터미널에 아래와 같이 순서대로 명령어를 입력한다. 1. netstat -a -o (현재 사용중인 포트 항목들이 보인다) 2. 사용하려
ashley-choi.tistory.com
4. 다시 localhost:3000/api-docs를 들어가면

CRUD가 추가된 화면으로 변경되었다.
(CRUD 관련한 추가 설명은 하단 포스팅 참조)
https://ashley-choi.tistory.com/60
Swagger API 사용법 번외(CRUD 설명)
💡crud.js 파일을 잠깐 훑어보자 코드 상단에 빈 배열을 가진 items라는 변수와,1이라는 숫자를 가진 idCounter 변수가 선언되어 있다. let items = [];let idCounter = 1; [ POST(create) 방식]router.post('/items',
ashley-choi.tistory.com
5. POST를 눌러서 데이터 하나를 생성해 보자.
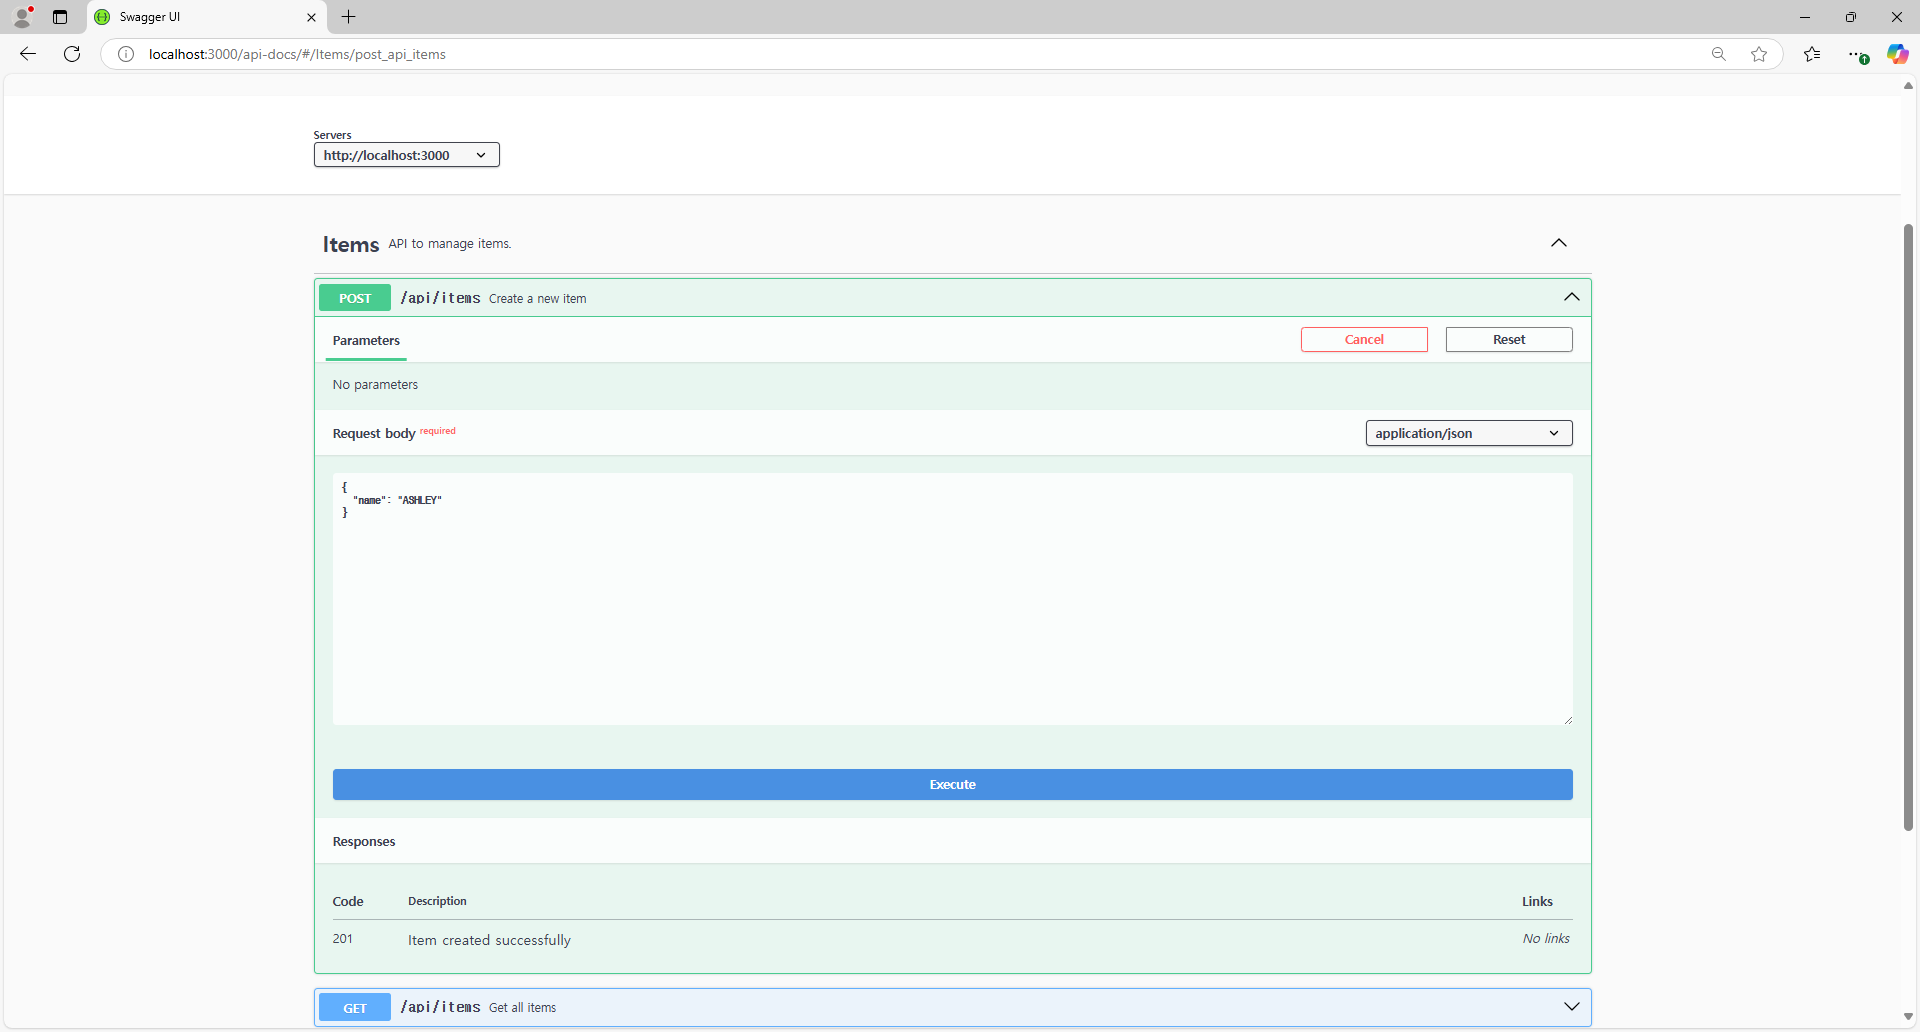
Request body에 name 값을 ASHLEY로 입력하고 Excute(실행)하면?
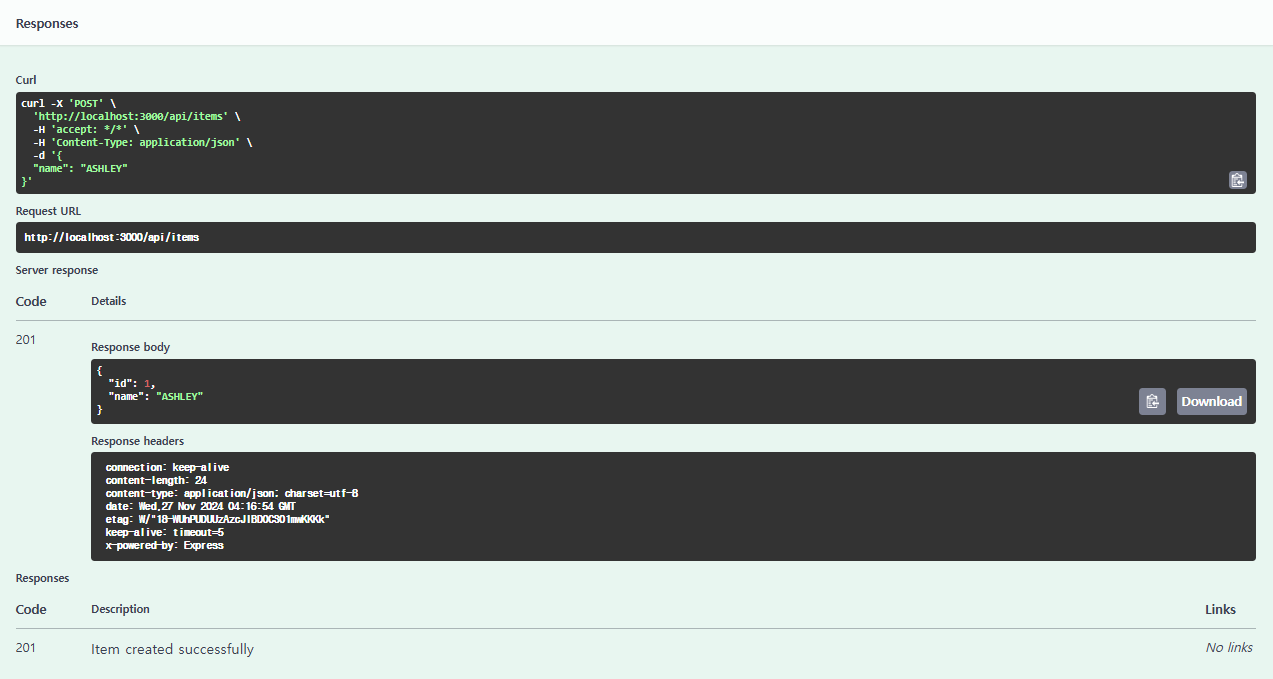
6. Responses body 항목에 id는 1, name은 ASHLEY로 값이 잘 저장되었다.
7. GET을 눌러서 방금 저장한 값이 잘 나오는지 확인해 보자.

위에서 Try it out버튼을 누른 다음에 Excute 버튼을 클릭하면,
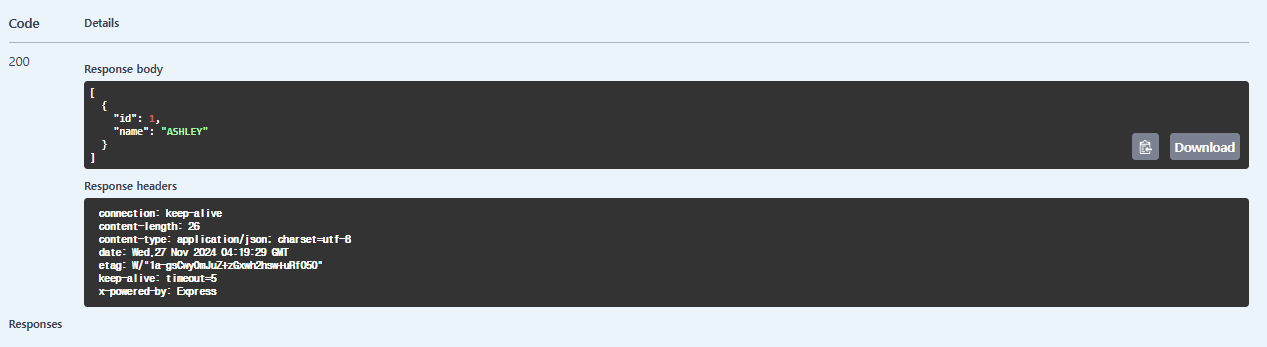
이렇게 검색이 잘 나오는 걸 확인할 수 있다.
8. PUT을 이용해 ASHLEY를 CHOI로 변경해 보자.

변경할 id값을 입력하고 name의 값을 choi로 변경 후 Excute 버튼을 클릭하면,
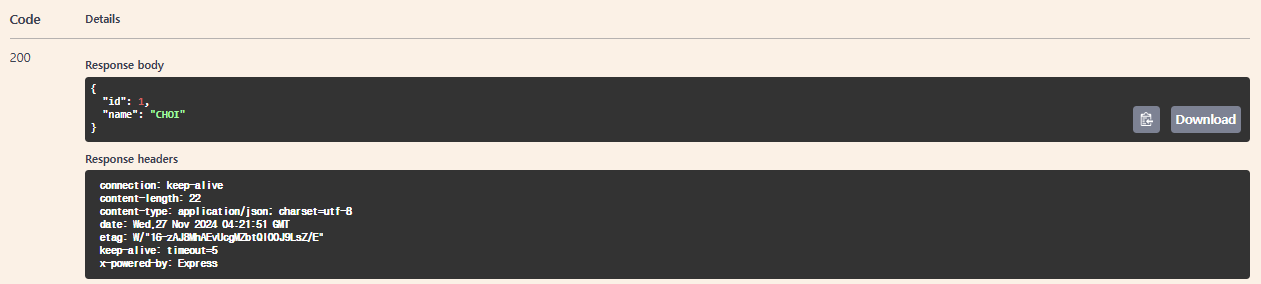
요렇게 변경이 잘된다.
GET으로 검색해 보면 CHOI로 변경된 검색값이 조회된다.
9. 마지막으로 DELETE를 이용해서 데이터를 삭제해 보자.
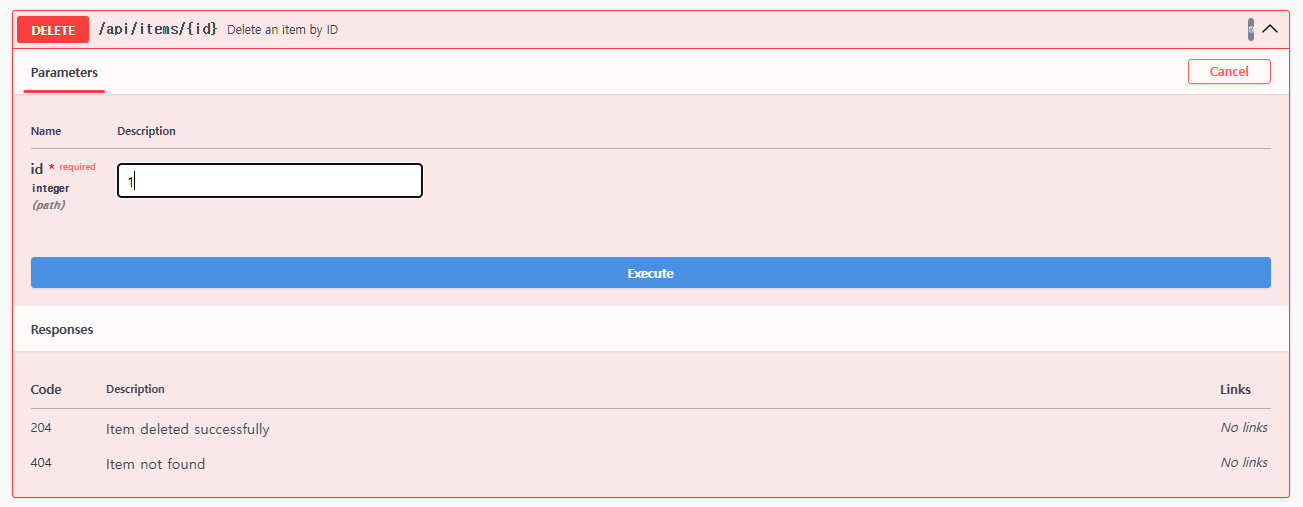
삭제하고자 하는 id값을 넣어준 후 Excute를 클릭하면,

응답에 204 코드가 나온다.
즉, 삭제가 잘 되었다는 의미이다.
'이것저것 공부' 카테고리의 다른 글
| API 게이트웨이(API Gateway) (1) | 2025.01.16 |
|---|---|
| 자료구조 힙(Heap) 예제 및 개념 (0) | 2025.01.15 |
| Swagger API 사용법 번외(CRUD 설명) (0) | 2024.11.25 |
| Swagger API 사용법 1탄 (1) | 2024.11.25 |
| 인터넷은 어떻게 작동할까? How does the internet work? (4) | 2024.07.23 |
